SenseCap T1000E Card User Guide
Power On
Power on by short press on the button.
Shortly, the LED will go solid green, indicating that the battery power is good and the device is NOT airborne.
Then straight after Mode - two long or two short beeps, and finally GPS fix aquired tune, which may come slightly later.
The LED will turn solid green after GPS position aquired.
Battery Charge Status
After switching the device on, the battery charge status is indicated by a sequence of short beeps:
| Beeps | Battery Level |
|---|---|
| 5x Beep | 95% or more |
| 4x Beep | 75% or more |
| 3x Beep | 55% or more |
| 2x Beep | 35% or more |
| 1x Beep | 15% or more |
Radio Mode
This device supports Four main protocols:
LATEST (latest compatible FLARM)
FANET
ADS-L
PilotAware (PAW)
The currently running protocol is indicated by the following beep sequences after the battery charge beeps:
| Sound | Protocol |
|---|---|
| Two long tones | FLARM mode |
| Two short tones | FANET mode |
| Four short tones | ADS-L mode |
| One long tone | PilotAware mode |
When Airborne
Slow Blink — The LED blinks slowly to indicate the device is in airborne mode.
Buzzer Sound Volume
Single-click the button to toggle between the buzzer volume levels: FULL → OFF
| Volume | Sound Indicator |
|---|---|
| FULL | Two rising tones |
| OFF | Two lowering tones |
Changing Settings on the Go
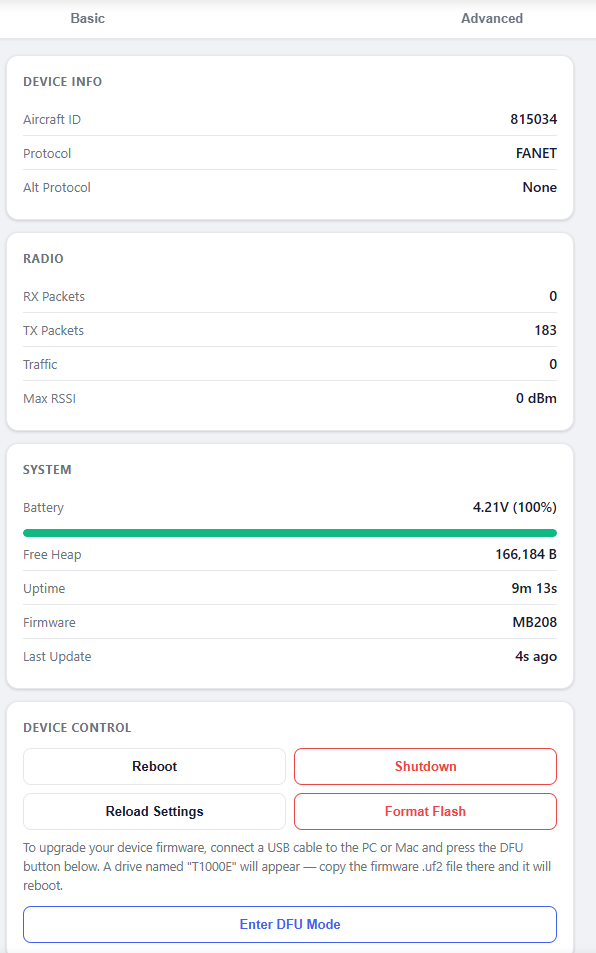
Most of device settings are configurable from the WebApp Configurator more information here Configurator
Changing Settings via Settings File
All settings are stored in a settings.json file on the device's USB storage. To edit it:
- Connect the powered-on T1000E card to your PC/Mac via USB.
- If connecting for the first time, you will be prompted to format the drive. Format it.
- After formatting, reconnect the device. A storage drive window will open.
- Double-click the button to initialize the settings file. This writes a default
settings.jsonand reboots the device. - Reconnect the device to your PC/Mac. Open the
settings.jsonfile in any text editor (e.g., Notepad). - Edit the values you want to change, save the file, then power-cycle the device to apply.
Example settings.json:
{
  "class": "SOFTRF",
  "protocol": "FANET",
  "altprotocol": "NONE",
  "band": "EU",
  "aircraft_type": "PARAGLIDER",
  "aircraft_id": "88BB50",
  "id_method": "DEVICE",
  "alarm": "LATEST",
  "txpower": "FULL",
  "volume": "FULL",
  "ignore_id": "000000",
  "alarmlog": "YES",
  "auto_sos": "NO",
  "logflight": "AIRBORNE",
  "loginterval": 4,
  "igc_pilot": "Chuck Yeager",
  "igc_type": "Ozone",
  "igc_reg": "Delta4",
  "fanet_name": "Chuck",
  "debug_flags": "000000",
  "sw_version": "SoftRF-MB177-VB008j-dev"
}sw_version field is written by the firmware — do not change it manually.
All Settings Reference
| Field | Description | Options / Format |
|---|---|---|
class |
File type identifier. Must always be present. | "SOFTRF" (fixed) |
protocol |
Primary radio protocol used for transmitting and receiving traffic. |
"LATEST" — New FLARM V7 (2024+), recommended"LEGACY" — Old FLARM protocol"FANET" — Paraglider / hang-glider network (Skytraxx)"ADS-L" — e-conspicuity protocol"OGNTP" — OGN tracking network"P3I" — PilotAware
|
altprotocol |
Secondary protocol transmitted every 4 seconds in addition to the primary. Useful for visibility across multiple networks. |
"NONE" — disabled (default)"LATEST", "LEGACY", "ADS-L", "OGNTP"
|
band |
Regional radio frequency band. Must match the hardware variant and your country. |
"EU" — 868.2 MHz (Europe)"US" — 915 MHz (Americas)"AU" — 921 MHz (Australia)"NZ" — New Zealand"CN" — China"UK" — same as EU unless P3I"IL" — 916.2 MHz (Israel)
|
aircraft_type |
Type of aircraft. Transmitted with every packet; used by FLARM collision algorithms and ground station displays. |
"GLIDER""TOWPLANE""HELICOPTER""PARAGLIDER""HANGGLIDER""POWERED""JET""UFO" — unknown / other"BALLOON""ZEPPELIN""UAV""WINCH" — ground-based winch launcher
|
aircraft_id |
Your aircraft's 6-digit hexadecimal ID. Use your ICAO registration ID if you have one; otherwise the device generates its own. Register this ID in the OGN database so you appear on tracking maps. | 6 hex digits, e.g. "88BB50". Default "000000" means auto-assigned. |
id_method |
How your 6-digit ID is classified in transmitted packets. |
"RANDOM" — changes every few minutes"ICAO" — ICAO registration"DEVICE" — fixed device ID (starts with "8")"ANONYMOUS" — random but fixed for the flight"OVERRIDE" — transmits the entered ID marked as device ID
|
alarm |
Collision alarm calculation method. |
"NONE" — no alarms"DISTANCE" — alarm based on proximity only"VECTOR" — alarm based on closing vector"LATEST" — full FLARM-style prediction including curved paths (recommended)"PG_HILL" — as Latest, with hill-soaring suppression after take-off (PG/HG only)"PG_NONE" — as Latest, but never alerts on other paragliders
|
txpower |
Transmit power level. |
"FULL" — up to 100 mW, normal operation"LOW" — ~2 mW, short-range testing"OFF" — receive only, no transmission
|
volume |
Buzzer volume for collision alarms and status beeps. | "FULL", "LOW", "OFF" |
ignore_id |
A specific aircraft ID to exclude from traffic reports and collision alarms (e.g., your regular towplane or flying partner). | 6 hex digits. Default "000000" disables this feature. |
alarmlog |
Whether to record collision alarm events to a log file (alarmlog.txt) on the device storage. The log can be visualised in the Alarm Log Viewer. |
"YES", "NO" |
auto_sos |
Automatically broadcast an SOS/distress signal if the device detects a crash (sudden stop after airborne movement). | "YES", "NO" |
logflight |
IGC flight logging mode. Logs are stored on the device and can be downloaded via USB. |
"OFF" — no logging"ALWAYS" — log from power-on"AIRBORNE" — log only while detected airborne"TRAFFIC" — log when airborne and nearby traffic is detected
|
loginterval |
Seconds between IGC log fixes. Lower values produce higher-resolution tracks but larger files. | Integer seconds, e.g. 1, 2, 4 (default), up to 155 |
igc_pilot |
Pilot name written into IGC flight log headers. Required for log files to be accepted on Weglide, OLC, etc. | Free text string, e.g. "Chuck Yeager" |
igc_type |
Aircraft/glider model name written into IGC log headers. | Free text string, e.g. "Ozone Enzo 3" |
igc_reg |
Aircraft registration or competition number written into IGC log headers. | Free text string, e.g. "Delta4" |
fanet_name |
Short name broadcast with FANET packets. Appears as a label on FANET-capable displays and tracking maps. | Short string up to ~10 characters, e.g. "Chuck" |
debug_flags |
Hexadecimal bitmask enabling internal debug and special operating modes. Leave as "000000" for normal use. See Under the Hood for advanced usage. |
6 hex digits, e.g. "000000" (default). Example: "800000" enables simulator mode. |
sw_version |
Firmware version string, written automatically by the firmware on first boot. Used to detect version changes and migrate settings. | Do not edit manually. |
Collision Alarms
SoftRF analyses the positions and trajectories of nearby aircraft and issues alarms at three urgency levels:
| Level | Time to collision | Buzzer |
|---|---|---|
| Level 1 (Low) | ≤ 19 seconds | 1 beep |
| Level 2 (Medium) | ≤ 13 seconds | 2 faster beeps |
| Level 3 (Urgent) | ≤ 9 seconds | 5 quick beeps |
If multiple aircraft are a threat simultaneously, beeps are doubled (levels 1–2) or extended to 7 (level 3).
Paraglider / Hang Glider Alarm Modes
Two additional alarm modes are available for paragliders and hang gliders:
"PG_HILL"— Hill-soaring filter- Uses
LATEST(full curved-path prediction) for all aircraft. While within 2 km horizontally and 1000 m (3000 ft) vertically of the take-off point, all alerts are suppressed to avoid nuisance alarms during the hill-soaring phase. Once clear of the launch area,LATESTapplies to hang gliders and all other traffic;DISTANCEapplies to other paragliders only (to reduce false alarms from slower thermalling traffic). Activates when own aircraft type is set to paraglider or hang glider. "PG_NONE"— PG-to-PG filter- Uses
LATESTfor hang gliders and all other aircraft. Other paragliders useDISTANCE. Hang gliders are faster-moving aircraft and always produce fullLATESTalerts. Useful in crowded PG sites where paraglider-to-paraglider alerts would be distracting.
Flight Logging
The T1000E Card logs IGC-format flight tracks to its internal flash storage. Logs are accessible by connecting the device to a PC/Mac via USB.
- Set
"logflight"to"AIRBORNE"or"ALWAYS"insettings.jsonto enable logging. - Set
"loginterval"to control the fix recording interval (e.g.,4seconds). - Fill in
"igc_pilot","igc_type", and"igc_reg"so that logs are identified correctly on flight sharing sites.
Flight logs are secured with G-records and accepted on Weglide and OLC, but are not IGC-certified.
Alarm events can be logged separately by setting "alarmlog": "YES". The resulting alarmlog.txt can be visualised using the Alarm Log Viewer tool.
Updating Firmware
Update Prompt in the Configurator
When you connect to your device with the SoftRF Configurator, the Status page checks for a newer firmware version. If one is available, a Firmware Update Available card appears showing your current version, the latest version and its release notes.
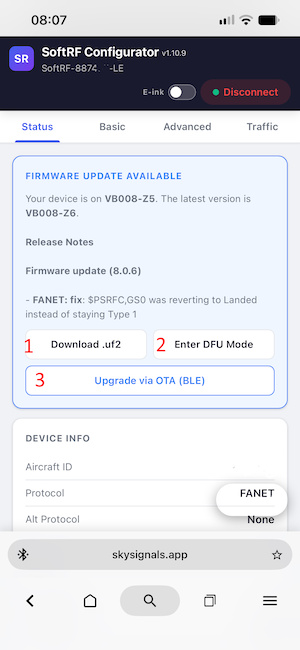
There are two ways to update:
- Method 1 — USB cable: buttons 1 Download .uf2 and 2 Enter DFU Mode.
- Method 2 — OTA over Bluetooth: button 3 Upgrade via OTA (BLE). This button only appears when the Configurator is connected to the device via Bluetooth.
Method 1: Update via USB Cable
- Tap Download .uf2 to download the correct firmware file for your device.
- Tap Enter DFU Mode. The device disconnects and restarts into USB update (DFU) mode.
- Plug the device into your PC/Mac or Android phone with a USB cable. A drive named T1000-E appears.
- Continue from step 4 of the USB update instructions below.
Method 2: Update via OTA (Bluetooth)
No cable needed — the firmware is sent from your phone to the device over Bluetooth.
Step 1: Start the OTA update
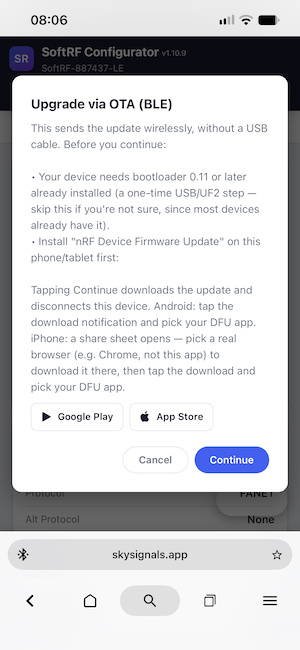
On the update card, tap Upgrade via OTA (BLE) (button 3 in the screenshot above).
Step 2: Check the prerequisites
A window lists what must be in place before you continue:
- Bootloader 0.11 or later installed on the device. This is a one-time USB step — see Getting Started, Step 3.
- SoftRF firmware VB008-z5 or later already running on the device.
- The nRF Device Firmware Update (DFU) app installed on your phone — use the Google Play or App Store buttons in the window.
If all of these are met, tap Continue. The device disconnects and restarts into Bluetooth update mode.
Step 3: Download the firmware
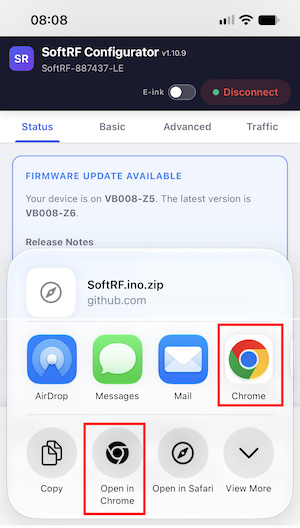
The firmware package (SoftRF.ino.zip) is downloaded and you are asked how to open it.
- iPhone: a share sheet opens. The best option is Chrome / Open in Chrome. When prompted, choose Save in Files, then open the downloaded file with Open in….
- Android: tap the download notification to open the file.
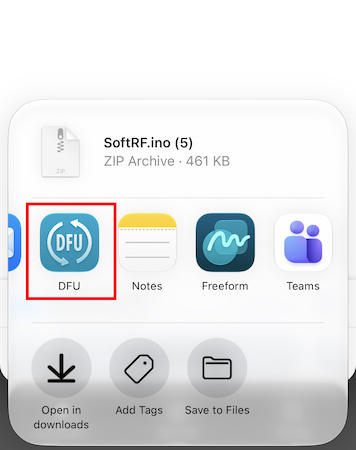
Step 4: Open the file with the DFU app
From the list of apps, choose DFU.
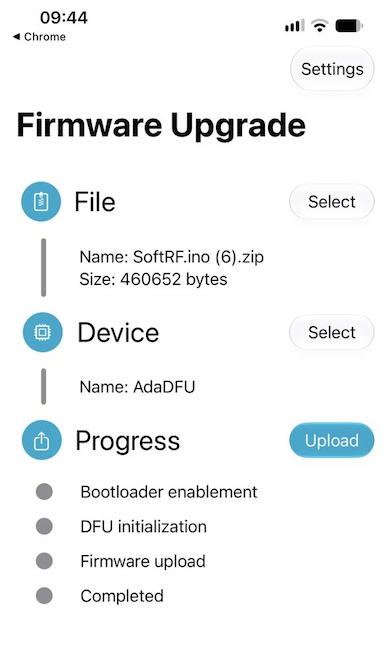
Step 5: Select the target device
The DFU app opens with the firmware file already filled in under File. Under Device, tap Select and choose AdaDFU from the list of Bluetooth devices.
Step 6: Install the firmware
Tap Upload to start the installation. The progress bar moves until the update is complete — keep the phone close to the device and leave the app open.
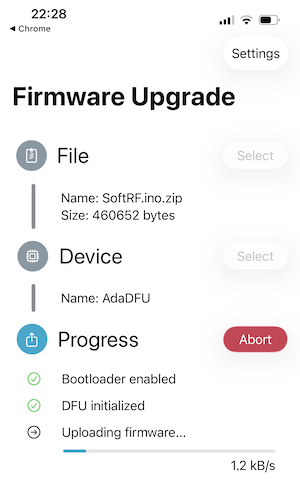
At the end of the update the device shuts down. Press the Power button to start it again.
Manual USB Update
- Download the latest
.uf2firmware file from the Releases page. - Connect the T1000E Card to your PC/Mac via USB while powered on.
- Hold the button and double-flick the mgnetic connector — a drive named T1000 appears. There will be three files on it.
- Drag the
.uf2file onto the T1000-E drive. - Wait approximately 30 seconds for the transfer and automatic reboot.
- Press Power button momentarily to start the device.
FANET Features
When operating in FANET mode, the T1000E broadcasts position and status data over the FANET radio network — a low-power mesh used by paragliders, hang-gliders, and mountain sport pilots. Your position, name, and status are visible in real time on compatible apps and devices including Skytraxx, Oudie N, XC Guide, GXAircom, BurnAir Map, and Puretrack.
Ground Tracking (2D) vs Flight Tracking (3D)
The device automatically switches between two tracking modes depending on whether it detects movement consistent with flight:
| Mode | When active | What is broadcast |
|---|---|---|
| Flight Tracking (3D) | Device is airborne — altitude and speed above threshold | Full 3D position: latitude, longitude, and altitude. Shown as a moving aircraft symbol on compatible maps. |
| Ground Tracking (2D) | Device is on the ground or stationary | 2D position: latitude and longitude only, with a ground status flag. Shown as a ground symbol with a status label on compatible maps. |
The transition between modes is automatic. No pilot action is needed.
Ground Tracking States
While in Ground Tracking (2D) mode the device broadcasts one of several status values that describe what the pilot is doing on the ground. These states are visible as labels or icons on Skytraxx, Oudie N, SkySignals,XC Guide, and BurnAir Map:
| State | Meaning |
|---|---|
| Flying | Airborne — shown in flight tracking mode |
| Active | On the ground, moving (walking to launch, packing up) |
| Idle | On the ground, stationary |
| Finished | Flight completed, pilot has landed and is done for the day |
| Need a Ride | Pilot is landed out and needs retrieval |
| Need Technical Support | Pilot has a technical issue (equipment problem, not an emergency) |
| Distress | Emergency — pilot needs urgent help. See SOS section below. |
SOS — Pilot in Distress
The SOS feature broadcasts an emergency signal when a pilot needs urgent assistance after a crash or injury.
Manual activation
Double-click the button while on the ground to toggle the SOS state on or off. When SOS is active:
- The device switches to Ground Tracking (2D) mode and broadcasts the Distress ground state.
- A FANET message is broadcast over the radio network: "SOS! Pilot in Distress" together with the pilot's GPS coordinates, so nearby pilots and rescue teams can locate you.
- The Distress status and coordinates appear on BurnAir Map, Skytraxx, Oudie N, and XC Guide.
To cancel SOS, double-click the button again. The device returns to normal operation.
Automatic activation (auto_sos)
If "auto_sos": "YES" is set in settings.json, the device monitors for a crash event (sudden stop after airborne movement). If a potential crash is detected:
- The device starts beeping to alert the pilot that SOS will activate.
- The pilot has 3 minutes to double-click the button to confirm they are OK and cancel the countdown.
- If no action is taken within 3 minutes, SOS activates automatically — broadcasting Distress status and the location message as described above.
FANET Name
The "fanet_name" field in settings.json sets a short pilot name that is broadcast with every FANET packet. This name appears as a label next to your position dot on:
- Skytraxx device screens
- Oudie N display
- SkySignals T1000 Companion App
- XC Guide app map
- GXAircom app
- BurnAir Map
- Puretrack Map
Keep it short (up to ~10 characters) so it fits cleanly on screen. Example: "fanet_name": "Chuck".
FANET Messages
The T1000E can send and receive short text messages over the FANET radio network. Messages travel directly between devices without any internet connection — useful in the mountains where cellular coverage is poor or absent.
Compatible devices and apps for FANET messaging:
- T1000E (this device) — send/receive via the XC Guide app over BLE
- T-Echo (Moshe Braner's SoftRF build) — send/receive with e-paper display
- GXAircom app
- Skytraxx devices
- Oudie N
- SkySignals T1000 Companion App
- XC Guide app
Messages are limited to approximately 60–80 characters. They are broadcast to all nearby FANET devices within radio range (typically 5–15 km in open terrain).
Weather Stations
FANET weather stations (installed at launch sites and mountain passes) broadcast local conditions over the FANET network including wind speed, wind direction, temperature, and humidity. The T1000E receives these broadcasts automatically whenever it is in FANET mode.
Received weather data can be displayed on the map in XC Guide, showing wind arrows and station data at the station's location. No internet connection is required — the data is received directly from the station over the air.
Other apps may gain support for FANET weather display in future updates.
Compatible App Matrix
The table below shows which features are supported by each compatible app when connected to the T1000E via Bluetooth LE.
| Feature | XC Track | XC Guide | FlySkyHi | SeeYou | SkyView |
|---|---|---|---|---|---|
| BLE Connection | ✓ | ✓ | ✓ | ✓ | ✓ |
| Battery Level | ✓ | ✓ | ✓ | ✗ | ✓ |
| FANET Name | ✓ | ✓ | ✗ | ✗ | ✓ |
$PFLAA Traffic Alarms |
✗ | ✓ | ✗ | ✗ | ✓ |
$FNNBG sentence * |
✓ | ✓ | ✗ | ✗ | ✓ |
| Settings from App ** | ✗ | ✓ | ✗ | ✗ | ✗ |
* $FNNBG is a FANET-enriched NMEA sentence that carries additional data not present in standard sentences: FANET weather station readings, pilot ground tracking state, and pilot name. Apps that support it can show weather overlays, ground state labels, and names directly on the map.
** Supported apps can read and write selected T1000E settings (such as protocol, alarm mode, and FANET name) directly from within the app, without needing to edit settings.json manually.
Registering Your ID
Use your aircraft ID from settings.json to register your aircraft with tracking databases so you appear on online maps: